Using Textures in Photography | A Complete Guide for Photographers
“Textures add layers and help create the illusion of depth, making images more engaging and three-dimensional.” - Alana Lee
Textures are one of the most powerful creative tools available to photographers. Used intentionally, textures add depth, atmosphere, and visual interest, helping images feel more dimensional, expressive, and refined.
Whether you are editing portraits, still life, landscapes, or fine art photography, digital textures and texture overlays allow you to enhance your images in ways that go beyond lighting and color alone.
This guide explains what textures are, why photographers use them, and how textures fit into modern editing workflows using Photoshop and other layer-based editing software.

What Are Textures in Photography?
In photography and visual art, texture refers to the perceived surface quality within an image. Texture can be real, implied, or digitally added during post-production.
Photographers work with texture in three primary ways:
Real texture captured in-camera, such as fabric, skin, stone, wood, or natural surfaces.
Implied texture created through lighting, contrast, and composition.
Digital textures or photoshop texture overlays applied during editing to add visual depth or stylistic effects.
Digitally applied textures allow photographers to shape the mood and look of an image long after the shutter is pressed. Subtle textures can soften transitions and add cohesion, while stronger textures can create painterly, vintage, or artistic effects.
When used well, texture enhances an image without distracting from the subject.
Looking for high-quality textures? Explore the Ultimate Photoshop Texture Overlay Collection, featuring hundreds of professional-grade textures for photographers.
Why Photographers Use Textures
Textures are not just decorative. They solve creative and practical challenges that photographers encounter across many genres.
Creative Benefits
Textures add visual depth and dimension to flat images.
They help define a recognizable editing style.
Textures influence mood and emotional impact.
They support painterly and fine art aesthetics.
They create cohesion across a gallery or series.
Practical Benefits
Textures help simplify or soften busy backgrounds.
They reduce reliance on complex sets or locations.
Textures increase perceived value in fine art and print sales.
They allow photographers to elevate images without reshooting.
Textures give photographers more creative control during post-production, especially when lighting or environments are limited.
If you want step-by-step instruction and hands-on examples, the Art of Texture Course teaches you how to apply textures in Photoshop and integrate them seamlessly into your editing workflow.

Common Challenges Textures Help Solve
Many photographers turn to textures when they feel something is missing from an image.
Textures help address:
Images that feel flat or lack depth.
Photos that need more atmosphere or emotion.
Inconsistent backgrounds across a series.
Creative blocks or repetitive edits.
The need to add polish without over-retouching.
Used intentionally, textures notice what lighting and color alone cannot always fix.
Want free sample textures to experiment with? Get access to exclusive free texture overlays in our Photography Freebie Vault.
Ways to Create or Source Digital Textures
Photographers typically work with textures in three main ways.
Using Texture Libraries
Pre-made texture overlays are available through professional collections and independent artists.
This option saves time and provides consistency across projects. High-quality libraries are designed for editing workflows and print resolution.
Creating Your Own Textures
Photographers can capture textures by photographing surfaces such as walls, fabrics, paper, paint, or natural elements.
This approach offers complete creative control and originality, though it requires time and experimentation.
Creating Textures Digitally
Textures can also be created entirely in Photoshop using brushes, gradients, filters, and custom tools.
This method allows photographers to design textures that perfectly match their aesthetic, but it has a learning curve.
Want to create your own textures? Learn how in The Art of Texture: Creating and Editing with Textures in Photoshop.

How Textures Are Used in Photoshop
Most photographers apply textures using layers in Photoshop or similar software.
A typical workflow includes:
Placing the texture as a layer above the image.
Experimenting with blend modes to control how the texture interacts with the photo.
Adjusting opacity to fine-tune intensity.
Using layer masks to control where the texture appears.

Layer masks allow photographers to protect skin, clothing, or important details while still benefiting from the texture in the background or surrounding areas.

Common blend modes for texture overlays include Multiply, Screen, Overlay, Soft Light, and Hard Light. The remind is always influenced by the colors and contrast in both the image and the texture.

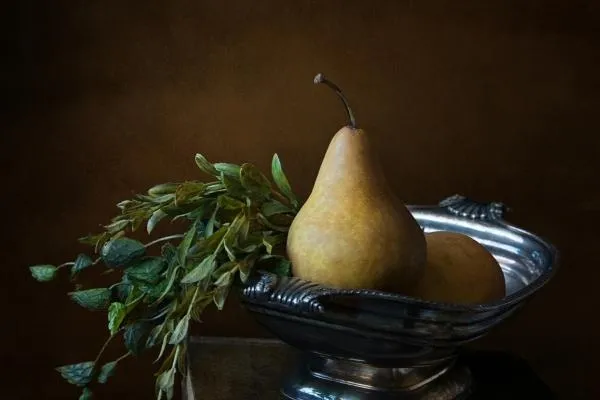
Texture Overlays in Different Photography Styles
Textures are not limited to one genre. They are used across many photographic styles.
Portrait photographers use textures to add softness, painterly effects, or visual interest to simple backdrops.
Fine art photographers rely on textures to create depth, mood, and gallery-ready work.
Still life photographers use textures to enhance surfaces and background elements.
Editorial and creative photographers use textures to add grit, drama, or abstraction.
Landscape and travel photographers use textures to soften skies, unify tones, or create vintage aesthetics.
The same texture can produce very different results depending on the image beneath it.
If you want a complete library of high-resolution options, explore the Ultimate Photoshop Texture Overlay Collection, which includes 276 professional textures for fine art and portrait editing. You can also find fine art textures that pair perfectly with portrait work inside the Ultimate Fine Art Editing Collection which includes painterly backgrounds, old masters backgrounds and additional texture overlays.
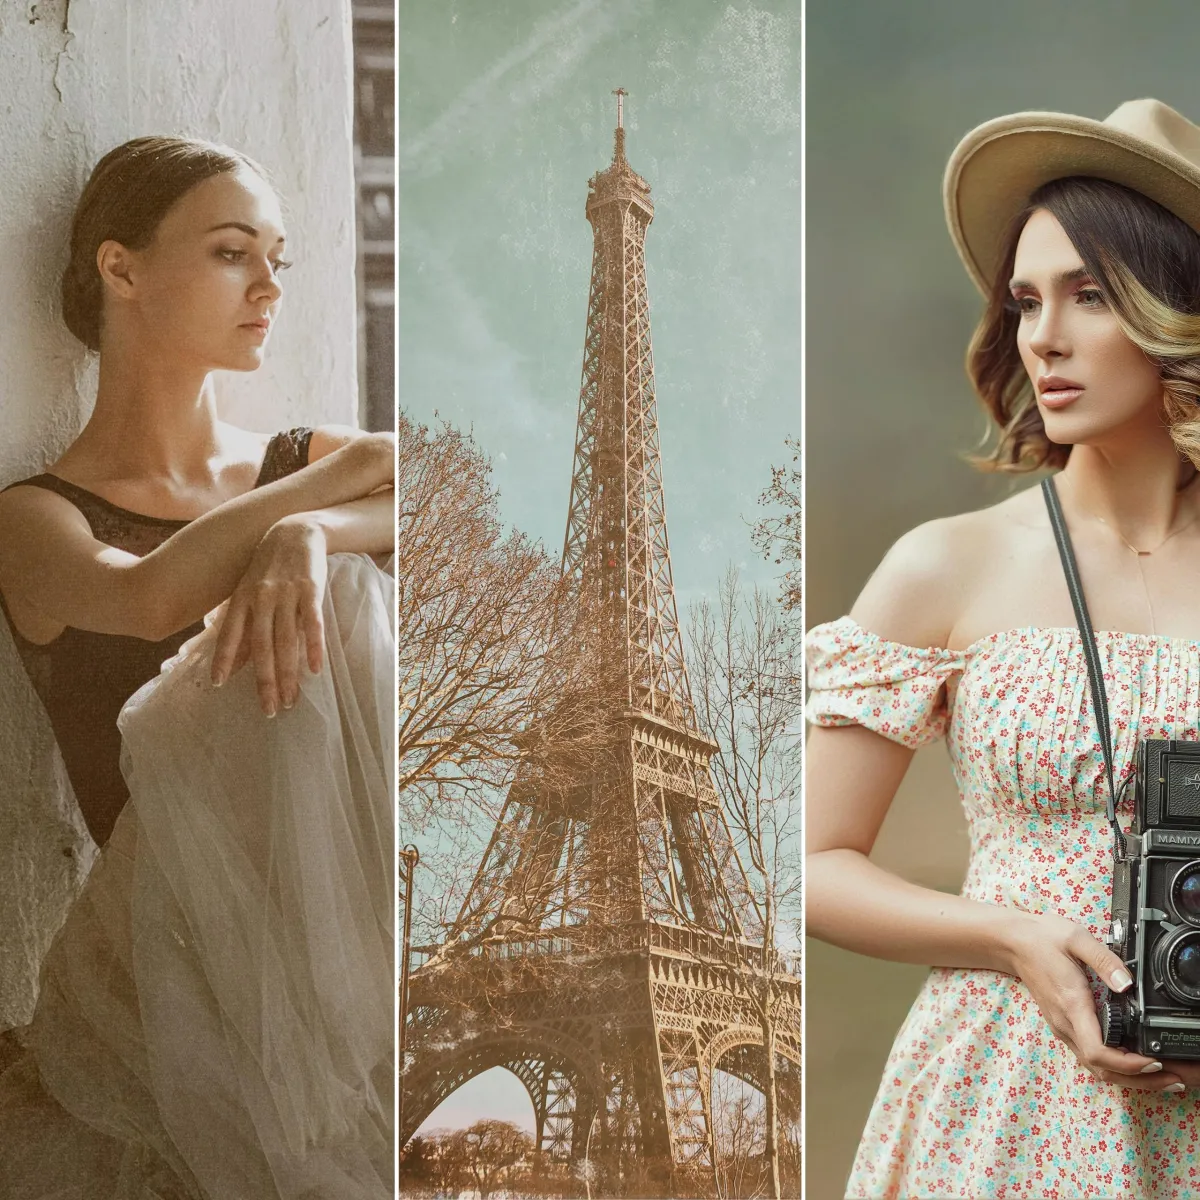
Texture Inspiration and Visual Examples
Before-and-after examples clearly show how textures transform photographs.
Examples include:
Adding painterly textures to fine art portraits.
Using subtle textures to elevate minimalist still life images.
Applying vintage textures for nostalgic or timeless looks.
Introducing abstract textures for editorial or creative work.
Textures do not replace strong composition or lighting. They enhance what is already present.

Before image @pexels-i-samkov-5255132. After edit by Alana Lee using textures from The Imaginator Studio

Before image @pexels-jj-jordan-5777416. After edit by Alana Lee using textures from The Imaginator Studio

Before image @pexels-erik-karits-19190193. After edit by Alana Lee using textures from The Imaginator Studio

Before image @pexels-eneida-nieves-917012. After edit by Alana Lee using textures from The Imaginator Studio

Before image @pexels-karolina-grabowska-5202161. After edit by Alana Lee using textures from The Imaginator Studio

Before image @pexels-feruzbek-matkarimov-2885940. After edit by Alana Lee using textures from The Imaginator Studio

Before image @pexels-tove-liu-3867371. After edit by Alana Lee using textures from The Imaginator Studio

Before image @pexels-pouriya-kafaei-14859268. After edit by Alana Lee using textures from The Imaginator Studio

Before image @pexels-monique-laats-736530. After edit by Alana Lee using textures from The Imaginator Studio
Building a Texture Workflow
As photographers become more confident with textures, they often move from experimentation to a repeatable system.
A strong texture workflow includes:
Choosing textures designed for photography.
Working non-destructively with layers and masks.
Applying textures intentionally, not automatically.
Adjusting color and tone for cohesion.
Refining texture strength based on output, especially for print.
Photographers who develop a consistent approach to textures gain more control and creative freedom in their editing process.
Create More Expressive Images With Textures
Textures expand what is possible in photography. They allow photographers to add depth, mood, and personality to their work without changing how they shoot.
Whether you prefer subtle refinement or bold artistic effects, textures are a flexible tool that grows with your style.
If you want to explore textures further, curated texture collections and structured learning resources can help you move faster and more confidently.
Ready to transform your images? Explore the Ultimate Photoshop Texture Overlay Collection and start creating stunning, textured artwork today!
Want to learn more about creating your own textures and how to edit with them? Check out our comprehensive texture course: